mist-cloud-eu.github.io
mist-cloud Quickstart
This tutorial covers:
- Getting set up the first time.
- Implementing a simple little system with three services.
- Hooking the services up to the event system.
- Testing the system locally.
- Deploying and securing everything in mist-cloud.
This tutorial is intended to quickly get you set up and ready to play around with mist-cloud, locally and in the cloud.
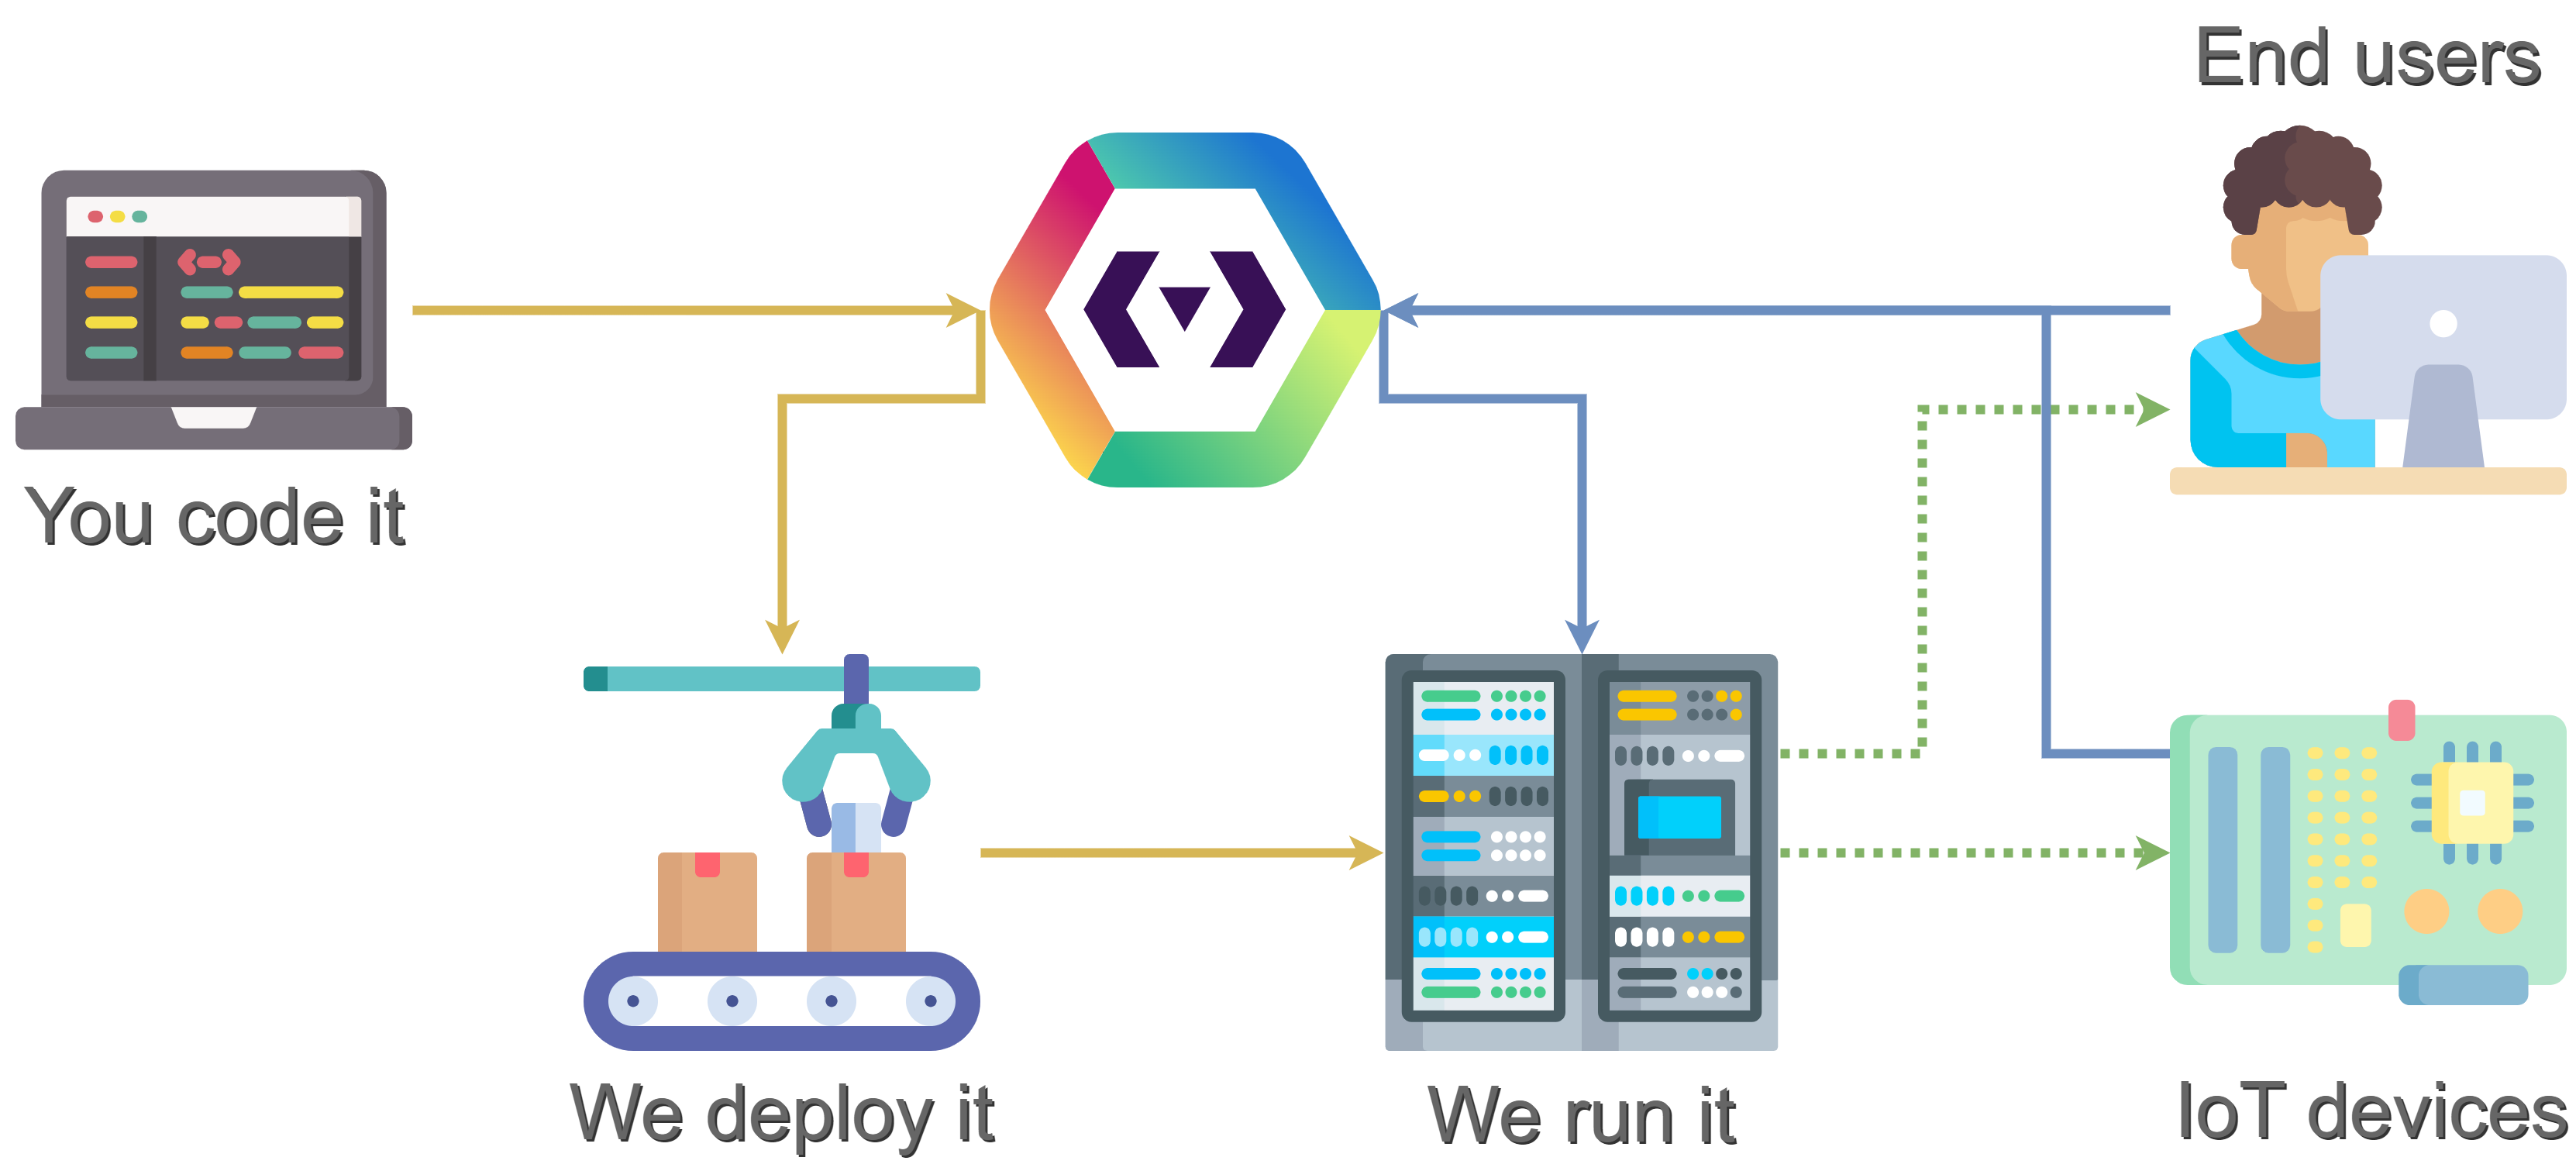
Before we dive in, let’s briefly look at the basic model of how the mist-cloud platform works with your software. You write some code, then push it via Git to mist-cloud, where it is packaged and deployed onto our servers (yellow path). When end users, IoT devices, or other external clients sends a request to mist-cloud the code is executed (blue path). Optionally your code can send replies back (green path), like in a server-client setup.
Install the necessary tools
Currently, all administrative tasks in mist-cloud are performed through a command-line interface (CLI). We use NodeJS’s Package Manager (npm) to install the mist-CLI, and all code is managed with Git. If you do not already have npm and Git installed follow this guide.
Install mist-CLI
-
Open PowerShell and run the command:
npm install -g @mist-cloud-eu/mist-cliThis command uses NodeJS’s Package Manager (
npm) toinstallthe mist-CLI, globally (g), i.e. accessible from any folder on the computer. -
Verify the installation by running the command:
mist version1.4.1
NB: if you get the following error:
```bash mist : File C:\Users\Christian Clausen\AppData\Roaming\npm\mist.ps1 cannot be loaded because running scripts is disabled on this system. For more information, see about_Execution_Policies at https:/go.microsoft.com/fwlink/?LinkID=135170. ``` You need to configure the execution policy for your system, see: https:/go.microsoft.com/fwlink/?LinkID=135170Create a user
From here, if at any point you get lost or stuck try running the command:
mist help
It usually has good suggestions for the next steps at the bottom of its output.
We use the mist-CLI to set up a new user account. During this process, we are guided through creating an RSA key pair and adding the public key to our mist user account.
mist login [your email]
Press enter to generate RSA key-pair, or enter a  public key manually:
Verification email sent to [your email]
After we click the “verify” link in the email, our account is created.
To verify that everything is setup correctly try running this command which should give an empty output:
mist list-organizations
[]
Showing that we haven’t got access to any organizations yet. Let’s create one!
Create an organization
Everything in mist-cloud has the same basic structure: Users and services belong to teams, which belong to organizations. Therefore we need to create an organization:
mist org [organization name]
mist commands do not change your working directory, so to work with an organization you also need to change the directory:
cd [organization name]
If you have a danish CVR number you can from this point forward sign up for early access at any time with the command:
mist sign-up-for-early-access [danish cvr number]
Use the default team
As mentioned before, services can only be owned by teams. Every organization has a default team. All we need to do is go into its directory:
cd default
We are now ready to start writing some code.
Create a service
We can now create our service.
mist service [service name]
cd [service name]
Implement the service
For this example we implement a system with 4 parts:
- A client posts either a
helloorholaevent containing a name in JSON format as its payload. - Service A listens for
helloevents and posts anintermediateevent. - Service B listens for
holaevents and also posts anintermediateevent. - Service C listens for
intermediateevents and posts areplyevent.
💡 We have made up the
hello,hola, andintermediateevents for this example, but thereplyevent has special meaning in mist-cloud.replyis the only reserved event type.
For simplicity services A, B, and C are in the same service repository. You can download the source code in your favorite programming language here:
- Typescript
git pull https://github.com/mist-cloud-eu/ts-template - Javascript
git pull https://github.com/mist-cloud-eu/js-template - Go (coming soon)
git pull https://github.com/mist-cloud-eu/go-template
Because we have mixed two git histories we also have to run:
git pull --rebase
The service templates share similar structure:
- The file
rapidsdefine a nice interface for posting to the rapids. - Then we have three business logic files, corresponding to each service described above;
english,spanish,interm. - The
appfile maps actions to code and parses the envelope’s payload then calls the appropriate business logic.
Finally, build the service with the command:
mist build
Subscribe to events
The mist.json file maps river/event combinations to actions, which are defined in code. We have three services in this repo so our mist.json should have a hook for each, mapping to the appropriate action.
{
  "hooks": {
    "english-river/hello": "english-action",
    "spanish-river/hola": "spanish-action",
    "common-river/intermediate": "intermediate-action"
  }
}
Since all the events are different (hello, hola, intermediate) the rivers have no effect here. Rivers only come into play if multiple services want to handle the same event.
If you have early access
Before we can deploy the service we have to have permission to `write_source_code`. We can do this by either making ourselves a Developer with the command: ```bash mist role Developer --user [email] ``` Alternatively, add `write_source_code` capability to the Administrator role with the command: ```bash mist capability write_source_code --role Administrator ``` You can see an overview of all capabilities in mist-cloud [here](/capabilities.html). Now, deploy the service with the command: ```bash mist deploy ``` When we deploy a service, mist-cloud automatically creates Rivers if necessary and sets up all the relevant subscriptions. We can check the status of the smoke test with the command: ``` mist queue ``` And even inspect the event in detail, including its output with the command: ``` mist inspect [message id] --river init ```Configure the API
By default, everything in mist-cloud is protected, and inaccessible to the outside. So in order to allow part 1 from above:
- A client posts either a
helloorholaevent containing a name in JSON format as its payload.
We first have to expose the hello and hola events.
We do this by registering them in the event catalogue. That is, in the api.json file in the event-catalogue folder of an organization.
{
  "hello": { "waitFor": 5000, "replyCount": 1 },
  "hola": { "waitFor": 5000, "replyCount": 1 }
}
In the event catalogue we also configure how the API should behave, in particular, its maximum wait time (waitFor 5000 milliseconds = 5 seconds) and how many reply events we expect (replyCount).
If you have early access
1. Deploy the event catalogue; Inside the `event-catalogue` folder, run the command: ```bash mist deploy ``` 2. Create an API key with the command: ```bash mist key "1 hour" ``` > ```bash > xxxxxxxx-xxxx-xxxx-xxxx-xxxxxxxxxxxx expires on ... > ``` 3. Allow the events through the API key, with the commands: ```bash mist event --key xxxxxxxx-xxxx-xxxx-xxxx-xxxxxxxxxxxx hello ``` ```bash mist event --key xxxxxxxx-xxxx-xxxx-xxxx-xxxxxxxxxxxx hola ```Triggering the service
We can now start a local version of our entire system by simply running the command:
mist run
This command finds the mist.json files from all the services we have checked out and simulates the Rapids-Rivers setup. It only uses local information, so this works offline as well.
While the simulator is running, we can trigger our service by opening a second terminal and running the command:
curl --silent -X POST \
     -d "[Your name]" \
     http://localhost:3000/rapids/hello
Whatever we put after /rapids/ is the event type, and what we put after the -d argument is the event’s payload.
If you have early access
We can trigger our service with curl: ```bash curl --silent -X POST \ -d "[Your name]" \ https://rapids.mist-cloud.io/xxxxxxxx-xxxx-xxxx-xxxx-xxxxxxxxxxxx/hello ``` Alternatively, specify the key as a header: ```bash curl --silent -X POST \ -H "mist-key: xxxxxxxx-xxxx-xxxx-xxxx-xxxxxxxxxxxx" \ -d "[Your name]" \ https://rapids.mist-cloud.io/hello ``` Whatever we put after the last `/` is the event type, and what we put after the `-d` argument is the event's payload. Again, we can check the status of each event with the command: ``` mist queue ``` And inspect a specific event in detail, including the services' output with the command: ``` mist inspect [message id] --river [river] ```Overview of the system
There is a lot of stuff happening when we trigger the system. So let’s go through it in detail. To make it simpler we have segmented it when each event enters the Rapids. Unless otherwise stated the simulator and cloud function identically.
- The client makes an HTTP
POSTrequest to mist-cloud with an API key (ie.xxxxxxxx-xxxx-xxxx-xxxx-xxxxxxxxxxxx), an event (ie.hello), and a payload (ie."John Smith").curl --silent -X POST \ -d "John Smith" \ https://rapids.mist-cloud.io/xxxxxxxx-xxxx-xxxx-xxxx-xxxxxxxxxxxx/hello - [Only cloud] mist-cloud verifies that this event is allowed on this key, which it is in this case.
- mist-cloud gets the wait time (ie.
5000ms) and reply count (ie.1) configuration fromevent-catalogue/api.json, then puts the event on the Rapids.{ "hello": { "waitFor": 5000, "replyCount": 1 }, ... }
- From the Rapids, each relevant River makes a copy, in this case only the
english-river. - Each River passes the event to one service which subscribes to it with a hook in
mist.json.{ "hooks": { "english-river/hello": "english-action", ... } } - The service is launched with the action mapped in
mist.json(ie.english-action). -
It runs the appropriate code, which posts a new event to the Rapids (ie.
intermediate). Then the service shuts down.Notice that no security check is performed here. Services post events directly to the Rapids.
- This event is again copied from the Rapids onto each relevant River, in this case only the
common-river. - Each River passes the event to one service which subscribes to it with a hook in
mist.json.{ "hooks": { ... "common-river/intermediate": "intermediate-action" } } - The service is launched with the action mapped in
mist.json(ie.intermediate-action). - It runs the appropriate code, which posts a special event to the Rapids (ie.
reply). Then the service shuts down.
- mist-cloud adds the reply-payload to a bundle to be sent back to the client.
- Once either the wait time expires or the reply count is reached mist-cloud sends the complete bundle. In this case, since the reply count is 1 it is sent back immediately.
It took a bit of work to set up this system because it involved first-time setup which only happens once and security configuration which rarely changes after it is set up.
First-time setup (only once):
- We installed some tools including the mist-cli.
- We created a user, with
mist login [email] - We created an organization, with
mist org [name]
Security configuration (rare):
- We configured the API in the
event-catalogue/api.json. - [Only cloud] We gave ourselves permissions to deploy code, with
mist role Developer --user [email] - [Only cloud] We deployed the event-catalogue, with
mist deploy - [Only cloud] We created an API key, with
mist key [duration] - [Only cloud] We allowed the event though the API key, with
mist event [event] --key [key]
Implementing code (common):
- We created a new service, with
mist service [name] - We implemented (cloned) the service.
- We configured hooks for the service in
mist.json. - We built the service locally, with
mist build - We tested the system locally, with
mist run - [Only cloud] We deployed the service, with
mist deploy
That’s it. You’re all set to start playing around on your own. Some interesting questions to explore in no particular order:
- How would you add another greeting or language?
- Can we split the service into two or even three repos?
- Implement a new service that also listens for
english-river/hellobut replies directly. What if we use a different river? What if we increase the reply count for hello? - Adding intermediate to the event-catalogue, what happens if we call it directly? Locally and on cloud?
- Removing hello from the event-catalogue, can we still trigger it? Locally and on cloud?
- Can we post multiple events from one service?
And just a reminder, if you have not done so already you should sign up for early access with the command:
mist sign-up-for-early-access [danish cvr number]
More to explore: